Earlier this week I posted a portrait as the next installment to our How Was This Picture Taken series. Most of our readers took this as an opportunity to stretch their brains a bit and try to use visual clues within an image to figure out how it was taken. They are rewarded all of the internet points.* A few, missing the entire point of the post in an effort to be “right”, decided to go directly to the image’s EXIF data and rattle off the technical details of the image. They are rewarded zero internet points.*
*internet points are imaginary, useless and non-redeemable for anything except for maybe bragging rights
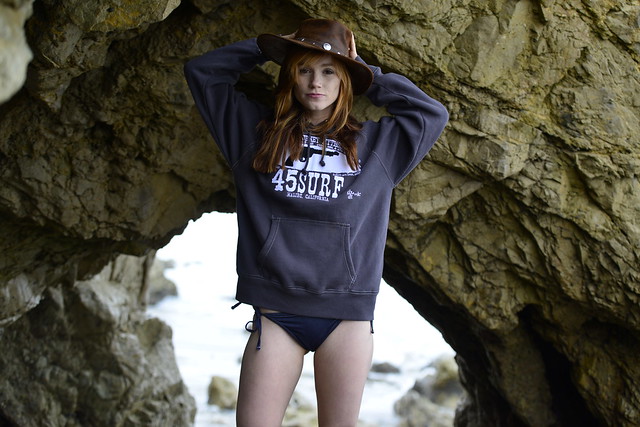
If you need a refresher, here is the original post and the photo in question (this time with metadata). I highly suggest you click on the image and view it that way versus embedded in the post. The image quality is better and it’s easy to compare to the next image:

NIKON D800 + 85mm f/1.4 @ 85mm, ISO 200, 1/640, f/1.4
As you can see from the caption with the metadata information, I used a full frame camera with an 85mm lens at an aperture of f/1.4. This is my go-to camera/lens combination for portraits like this. Whenever possible I shoot at f/1.4, which gives the background a beautiful, dreamy look like you see here. A few people guessed that I spot metered for the face, which is indeed what I did.
This image was taken in Fort Collins, CO near the Poudre River. I positioned Sander about 10 feet in front of some bushes that were growing near the river. With the sun behind him, there were specular highlights on the leaves from the direct sun that was hitting them. At an aperture of f/1.4, these highlights turned into the soft, appealing bokeh you see here.
Since the sun was behind him, I also used a white reflector to add a bit of fill light to the side of his face that was away from the sun (due to the reflector, you can see a very soft shadow from his collar on his neck). Some people guessed that I used a secondary light source like a strip light or an LED panel for fill, but this wasn’t the case. I had him standing in open shade with plenty of light coming from the sky (which created the horizontal catch lights in his eyes) to keep shadows to a minimum. No additional lighting was used to compliment the sun.
Now let’s take a look at the original (again, click on it and you can easily toggle back and forth between the original and final image):

NIKON D800

Can you tell what was done to it? You should be able to tell that it’s now warmer and has more contrast than the original. Here’s a screenshot of my Lightroom settings so you can see what I did:

Lightroom Screenshot With Develop Settings
Not shown in these settings are also a slight curve adjustment to make everything pop a bit more and split toning to warm things up a bit. I also used Lightroom’s lens correction for the particular lens I used. If you compare the original to the edited version, you’ll also see that I removed a few small blemishes, which is pretty standard for any portrait work. No additional masking or dodging of Sander’s face was involved.
You might think this is all I did to this image. I could have stopped there and been happy, but since I liked this image so much, I wanted to add just a little something extra. Maybe if you look at the image without it you’ll be able to notice:

Lightroom Screenshot With No Gradients
Doesn’t it look more plain? That’s because I added two colored gradients, one to each side. I added a slightly overexposed light yellow gradient coming from the top-right corner (which enhances the sunlight) and a slightly underexposed green gradient coming from the upper-left side (which enhances the foliage).
Here are screen shots of both gradients and their settings:

Lightroom Screenshot With Yellow Gradient

Lightroom Screenshot With Green Gradient
Once you know to look for it, this is an effect you’ll see used occasionally in portrait and wedding photography. I never try to go too crazy with it (some people add reds, blues and other colors), but it does come in useful when you want to add a little something extra, yet subtle, to your images. I should also note that this was done before Lightroom introduced the ability to use an eraser brush on portions of a gradient, so if you look closely you might see a very slight tint of green on his hair.
Finally, at what point during the photo session did I take this photo? This was one of the last images of the day. I find that almost everyone starts out portrait sessions wanting to do big “cheese” smiles. That’s what we’re taught to do in front of the camera from the time we’re old enough to smile. Photos of a nice big smile are great, but I also like to get some that are more calm and relaxed, as it’s actually a more natural look for our faces (not to mention most teenagers prefer a more “moody” photo to a big smile). This is difficult to do until the end of a session. By that point, my subjects trust me and are more willing to do something a little different, even if it’s only as simple as not smiling for a photo.
Hopefully this was fun for you and you learned something along the way. It was great reading all of your guesses and responses. Thanks for playing along and I’ll be on the lookout for another photo to use for the next How Was This Picture Taken!
This article originally appeared on Photographylife
Amazon


Nikon D810 Digital SLR Camera Body with 28-300mm VR Lens + 64GB Card + 2 Batteries/Charger + Case + GPS Adapter + Grip + Kit
$3,799.99


Free shipping

Neewer DSLR Camera Shutter Release 320ft/100m Wireless Remote Control 2.4G 16CH Transmitter Receiver for Nikon D800/D700/D300/D2/D1/D200/D4/N90s/F5/F6/F100/F90/F90X/D3S, Fujifilm S5 Pro/S3 Pro, Kodak DCS-14N
$19.99
Free shipping

David Busch's Compact Field Guide for the Nikon D800/D800E (David Busch's Digital Photography Guides)
$12.59
Free shipping

$1,596.95
Free shipping

$216.95
Free shipping

$446.95
Free shipping

$1,696.95
Free shipping

$1,596.95
Free shipping

$4,393.90
Free shipping

eBay


Bids: 14

Buy It Now
Free shipping

Buy It Now


Buy It Now
Free shipping

$2,269.00
Buy It Now
Free shipping

Bids: 0
Free shipping
Buy It Now

Buy It Now
Free shipping


Bids: 0

Buy It Now
Free shipping

Buy It Now
Free shipping
Flickr


GoogleBooks - GoogleNews

Nikon D800 & D800E Digital Field Guide
John Wiley & Sons. 2012

Mastering the Nikon
Rocky Nook, Inc.. 2014
Mastering the Nikon D810 by Darrell Young provides a wealth of experience-based information and insights for owners of the new D810 camera. Darrell is determined to help the user navigate past the confusion that often comes with complex and powerful professional camera equipment. This book explores the features and capabilities of the camera in a way that far surpasses the user's manual. It guides readers through the camera features with step-by-step setting adjustments; color illustrations; and detailed how, when, and why explanations for each option. Every button, dial, switch, and menu configuration setting is explored in a user-friendly manner, with suggestions for setup according to various shooting styles. Darrell's friendly and informative writing style allows readers to easily follow directions, while feeling as if a friend dropped in to share his knowledge. The information in this book goes beyond the camera itself and also covers basic photography technique.

David Busch's Nikon D4/D4s Guide to Digital SLR Photography
Cengage Learning Trade. 2014
DAVID BUSCH'S NIKON D4 GUIDE TO DIGITAL SLR PHOTOGRAPHY is your best bet for getting great results with your D4. Nikon's new flagship camera, the D4 includes a 16.2 megapixel sensor, advanced HDTV video features, ISO up to 204,400, and a completely new exposure sensor with 91,000-pixel resolution. If you're hoping to use your new Nikon D4 to explore the world of digital photography, to flex your creativity, or to do your job better, this is the book for you. With clear how-to steps and full-color illustrations, DAVID BUSCH'S NIKON D4 GUIDE TO DIGITAL SLR PHOTOGRAPHY covers all the features of this capable camera in depth, from taking your first photos through advanced details of setup, exposure, lenses, lighting, and more, and relates each feature to specific photographic techniques and situations. With David Busch as your guide, you'll be in full creative control, whether you're shooting on the job, as an advanced hobbyist, or are just out for fun. Start building your knowledge, creativity, and confidence with the Nikon D4 today.

Nikon Offers 'Maintenance Service Initiative' to D800 and D700 Owners
July 14, 2015 - PetaPixel (blog)Nikon has begun contacting owners of D800 and D700 DSLRs with an offer to participate in a new “Maintenance Service Initiative.” Photographers who are interested can have their camera sent to Nikon's repair center, examined, cleaned, and repaired (if...

Photos of the week
January 16, 2016 - Pacific Daily NewsHe took the photos from the Hotel Nikko Guam using a Nikon D800, a tripod and remote release trigger to avoid the shutter press creating camera shake. He used a telephoto zoom lens at the 80 mm setting. His camera settings were ISO 160 at F8, and bulb...

Nikon J5 Review: A vastly improved Nikon 1-series camera
January 20, 2016 - imaging resourceAfter the D600 sensor and D800 autofocus problems but mainly how Nikon handled them. I've shot Nikon since the EM to the D300s and every body in between but bought a Canon in 2010 and have been very happy. I recently took a M3 on a trip and now...
Nikon D800 Tutorial: All the Functions, Settings, and Menus by Carlos Erban
This video is a follow up to the one reviewing the D800 Manual. I go through all the functions, settings, and menus of the D800 with an explanation for each one ...
Related Articles
Digital Photography Basics For Amateur Snappers
The Amsnaps System Includes Digital Photography Basics For Amateur Snappers And Is A Step-by-step, Easy-to-follow, Printable Ebook Guide That Will Have You Taking Awesome Shots, Even If You're A Complete Beginner Or Never Really Touched A Camera Before.
Manual De Técnica Fotográfica
Iníciate En El Mundo De La Fotografía De Manera Profesional. Este Manual Proporciona Los Fundamentos Base De La Fotografía De Forma Rápida Y Práctica. Más De 340 Páginas, Ilustraciones Y Un Lenguaje Sencillo Para Aprender De Principio A Fin Correctamente.
Photography Masterclass
New! From Creator Of #1 Photography Product On CB - Video Tutorials For Beginner And Hobbyist Photographers. Anyone With A Dslr Camera Will Want To Get Their Hands On This! Earn 60% Per Sale! Extremely Low Refund Rate! See /affiliates.html Page.
Card Recovery Professional
Recover Lost Or Deleted Files In 3 Steps. 100% Risk Free! Support All Camera Memory Card, Such As Sd Card, Xd Card, Cf Card, Etc. Support All Camera Brands And Almost All Raw File Formats.
Compuclever Ultra File Opener
Got A File But Can't Open Or View It? Well, Compuclever Ultra File Opener Can Help As It Supports Over 500 Different File Types! View, Edit, Convert & Print Files With Ultra File Opener. Promote Ufo And Earn Great Commissions!
Read More here: How Was This Picture Made #5: The Answer
from WordPress https://www.aioshop24.com/picture-5-answer/
via IFTTT


